

What changed everything for me was holding back the sauce. I used to toss everything together from the start, thinking it would soak in better. Nope. It burned, turned bitter, and left me with sad, patchy chicken. Cooking first, glazing after—that’s the trick that finally gave me that sticky finish without the mess.
I hear this a lot from other home cooks: air fryer chicken comes out pale or uneven, and sauces either dry out or scorch. I went through all of that. This method fixes it without adding extra steps or stress, which matters when I’ve got three kids asking “is dinner ready yet?” every five minutes.
And here’s something I didn’t expect—the texture. You get these lightly crisp edges, but the inside stays juicy, almost like it’s been marinated for hours. It feels like more effort than it actually is. Trust me, this one is worth it.
Air Fryer Korean Gochujang Chicken — Sticky, Spicy & Ready in 20 Minutes: The batch that went from burnt mess to weekly request
The first time I tried this, I was rushing. I had chicken, a jar of gochujang, and about 25 minutes before chaos hit the kitchen. I mixed everything together, tossed it in the air fryer, and walked away thinking I had dinner handled.
I came back to smoke and a smell that was way too sharp. The sugar had burned, the sauce turned dark and bitter, and the chicken wasn’t even fully cooked. I remember standing there thinking, “well… that’s not going on the blog.”
The next time, I slowed down just enough to think it through. I cooked the chicken plain first, let it get those golden edges, then added the sauce for the last few minutes. Completely different result. The glaze thickened, clung to every piece, and didn’t burn.
Now I make this at least once a week. It also solved my “everyone wants something different” problem—this chicken goes into rice bowls, wraps, even tucked next to veggies, and no one complains.
Why You’ll Love This Air Fryer Korean Gochujang Chicke
- The glaze goes on at the end, so it thickens instead of burning
- Cornstarch gives the chicken a light coating that grabs onto the sauce
- Bite-sized pieces cook evenly, so you don’t get dry edges and raw centers
- The air fryer creates those slightly crisp edges without deep frying
- The sauce reduces right on the chicken, turning glossy and sticky
- Balanced mix of sweet, salty, and heat without needing extra steps
- You can actually see when it’s ready—the edges darken just slightly and shine
What You’ll Need
Air Fryer Korean Gochujang Chicken
- Boneless chicken thighs – I stick with thighs because they stay juicy even if you go a minute too long; breast works, but it’s less forgiving
- Cornstarch – this is what gives that light crisp coating; skip it and the sauce won’t cling the same way
- Neutral oil – just a little helps the browning start instead of drying out
I’ve tried this with chicken breast, and it works, but you need to watch it closely. It cooks faster and can dry out before the glaze sets. Thighs give you a little breathing room, which I appreciate on hectic evenings.
Also, don’t skip drying the chicken. I used to rush that step, and it really does make a difference. Dry chicken = better browning. Wet chicken = steaming.
Sauce & Marinade
- Gochujang – this is the heart of the dish, slightly sweet, spicy, and deep; different brands vary, so taste yours
- Soy sauce – adds salt and rounds everything out
- Honey or brown sugar – helps create that sticky finish when heated
- Rice vinegar – cuts through the sweetness so it doesn’t feel heavy
- Garlic – I use fresh, always; it mellows as it cooks
- Ginger – adds a warm bite that balances the chili paste
- Sesame oil – just a small drizzle at the end brings everything together
I learned the hard way that too much sugar burns fast in the air fryer. If your gochujang is already sweet, go lighter on the honey. You can always add a little more at the end, but you can’t fix burnt.
If the sauce feels too thick when mixing, add a splash of water. It should coat a spoon but still move a bit. Thick paste straight into the air fryer tends to scorch.
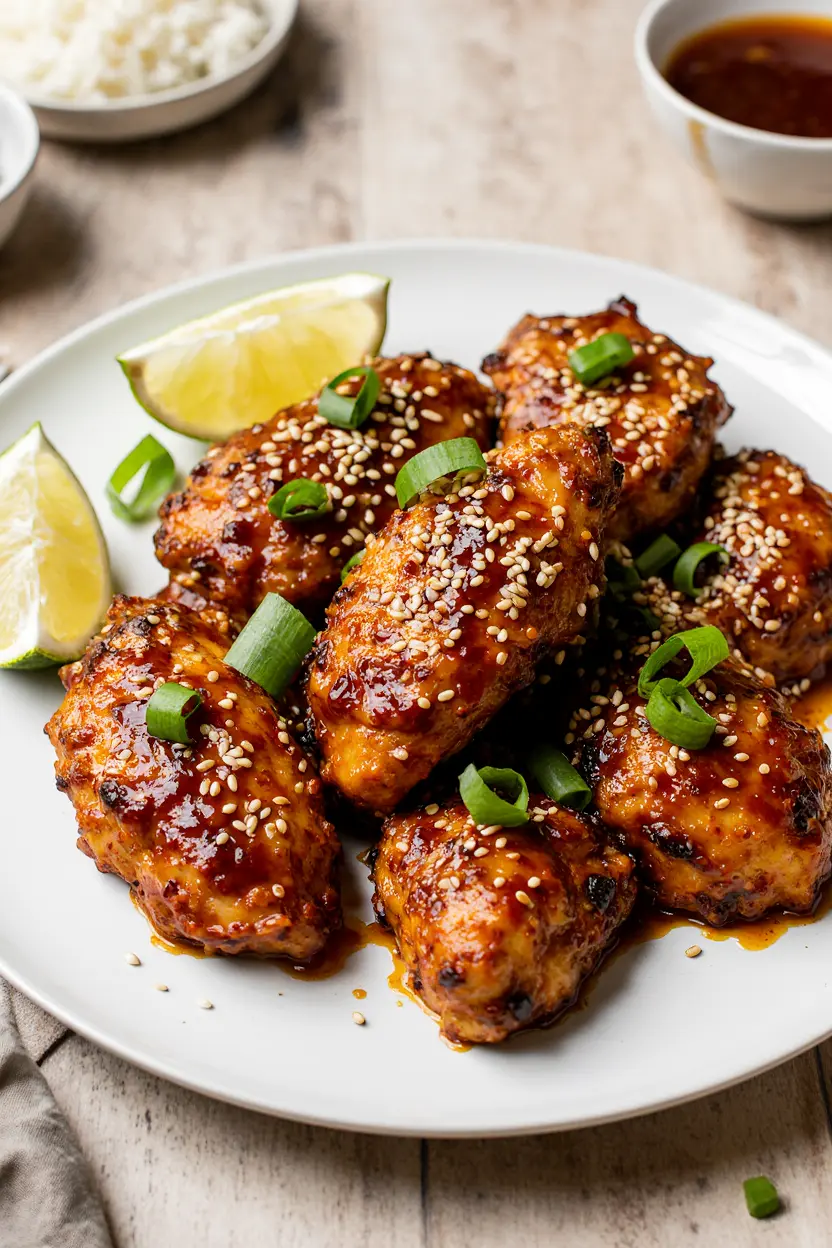
Toppings
- Sesame seeds – a little crunch and a nice contrast to the sticky coating
- Green onions – fresh and sharp, they balance the richness
I usually toss these on right before serving. My kids sometimes pick off the green onions, but I keep adding them anyway. They really do balance the dish.
How to Make Air Fryer Korean Gochujang Chicken
Prep & Coat the Chicken
Step 1: Cut evenly – Slice the chicken into bite-sized pieces, about 1.5 inches. When they’re similar in size, they cook at the same rate, which saves you from picking out undercooked pieces later.
Step 2: Dry and coat – Pat the chicken dry, then toss with cornstarch and a little oil. You’re looking for a light, dusty coating, not thick or clumpy. The pieces should look like they’ve been lightly powdered.
I used to skip drying because I was in a hurry. Big mistake. The difference in browning is noticeable right away once you stop rushing that step.
First Air Fry Phase
Step 3: Arrange with space – Place the chicken in a single layer. If they’re touching too much, they steam instead of crisp. I cook at 400°F.
Step 4: Cook until lightly golden – After about 8–10 minutes, the edges should look lightly browned and feel firm, but not fully crisp yet. You’ll start to smell that toasted cornstarch aroma.
Halfway through, I shake the basket. You’ll hear the pieces knock against each other—that’s a good sign they’re starting to firm up.
If your chicken still looks pale at this stage, give it another minute or two. This step builds the base for the glaze to stick.
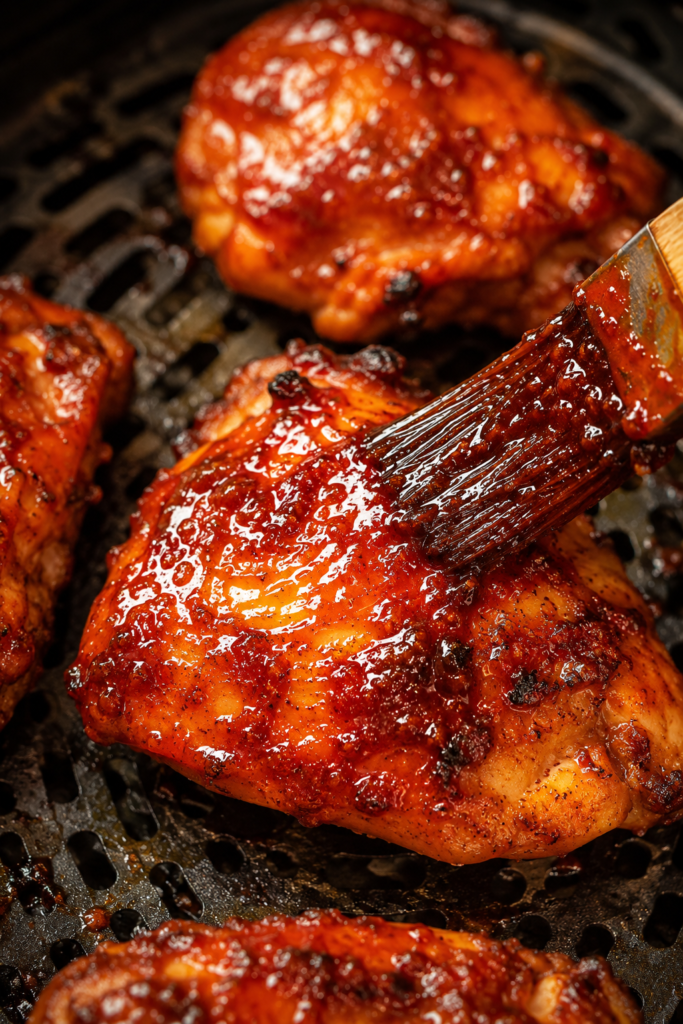
Glaze & Finish
Step 5: Toss in sauce – Move the chicken to a bowl and coat with the sauce. It should cover every piece without pooling too much at the bottom.
Step 6: Final cook – Back into the air fryer for 3–5 minutes. Watch closely—the sauce should bubble, thicken, and turn glossy.
This is where things happen fast. I’ve overcooked it by answering a text, and suddenly the edges went from sticky to slightly bitter. Stay nearby.
When it’s ready, the chicken looks shiny and slightly darker at the edges, and it smells a little sweet and smoky.
Making the Sauce
Quick Gochujang Glaze
I mix everything in one bowl—gochujang, soy sauce, honey, vinegar, garlic, ginger, and sesame oil. It should be thick but not stiff. When you lift a spoon, it should slowly drip, not plop.
If I have an extra minute, I warm it in a small pan for about a minute. It smooths out and gives you a head start on that sticky texture. Not required, but I like the result better.
Sometimes I add a tiny splash of the honey garlic sauce I keep in the fridge when I want it a little sweeter for the kids.
Pro Tips for Best Results
- Don’t add sauce at the start — it burns before the chicken cooks through
- Cut pieces evenly — uneven sizes cook at different speeds
- Shake the basket halfway — helps all sides brown evenly
- Watch the final 2 minutes closely — the glaze thickens fast
- Use thighs if possible — they stay juicy under high heat
- Keep space between pieces — airflow creates better texture
- Add sesame oil at the end — heat dulls its flavor if added too early
- Let it sit 2 minutes before serving — the glaze sets and sticks better
Common Mistakes to Avoid
- Adding sauce too early — sugar burns and turns bitter
- Skipping cornstarch — results in a thinner coating that slides off
- Overcrowding the basket — traps steam and prevents browning
- Using too much sauce — causes pooling and uneven cooking
- Not drying chicken — leads to steaming instead of crisping
- Cooking too long after glazing — makes the sauce dark and harsh
- Too much sugar — burns quickly in high heat airflow
Easy Variations
I switch this up depending on what I have or what the kids are in the mood for.
- Swap thighs for breast and reduce cook time slightly
- Add chili flakes for extra heat
- Stir in a bit of orange juice for a sweet citrus twist
- Use tofu cubes instead of chicken for a meat-free version
- Serve in lettuce wraps with crunchy veggies
- Pair with something like Air Fryer Patatas Bravas for a fun dinner spread
- Try it alongside Baked Chicken Drumsticks if you’re feeding a crowd
How to Serve It
I always serve this right after cooking. That sticky coating is at its peak when it’s fresh and glossy, and the edges still have a little crisp to them.
Most nights, it goes straight over warm white rice. The extra sauce drips down and soaks in, which honestly might be my favorite part.
For something fresh on the side, I like quick pickled onions. I’ve used this quick pickled red onions with citrus twist a few times, and it cuts through the richness nicely.
If we’re doing a casual dinner, I’ll put everything out and let everyone build their own bowls. My son piles on extra chicken, my daughters go heavy on rice and toppings. It works.
And if you’re already using the air fryer, you could add something like my Air Fryer Buffalo Cauliflower Recipe on the side for a mix of flavors.
Storage and Reheating
I store leftovers in a sealed container in the fridge for up to 3 days. The glaze thickens as it sits, which actually makes it even stickier.
If I’m planning ahead, I keep the sauce separate and only glaze what I need. It reheats better that way.
To reheat, I use the air fryer at 350°F for about 4–5 minutes. It brings back those edges without drying the inside.
The microwave works, but the texture softens a lot. If I do use it, I’ll still pop it in the air fryer for a minute after.
I don’t usually freeze this one. The texture changes a bit too much for me once thawed.
FAQ
Can I make this recipe less spicy?
Yes, reduce the gochujang and add a bit more honey or even a spoon of ketchup. That keeps the texture of the glaze while softening the heat.
Can I cook this without an air fryer?
You can bake it at 425°F or cook it in a pan. You’ll still get good flavor, but the edges won’t have quite the same texture.
Why didn’t my glaze turn sticky?
It likely needed more heat at the end. The sauce has to bubble and reduce slightly to thicken. If it still looks wet, give it another minute or two.
Related Recipes
- Korean Spicy Chicken Rice Bowls
- Honey Garlic Chicken Bites
- Air Fryer Teriyaki Chicken
- Korean BBQ Skewers
Helpful References:
- 30 Minute Honey Garlic Chicken
- Quick Pickled Red Onions With Citrus Twist
- 35 Minute Homemade Tangy Bbq Sauce For Grilling Season Secret
Air Fryer Korean Gochujang Chicken
- Prep Time: 10
- Cook Time: 30
- Total Time: 40
- Yield: 4 servings 1x
- Category: Dinner
- Method: Air Fryer
- Cuisine: Korean
Description
This air fryer Korean gochujang chicken is tender, bite-sized chicken with lightly crisp edges coated in a glossy, sticky, sweet-spicy glaze. It’s fast, flavorful, and perfect for weeknight dinners or easy meal prep.
The key is cooking the chicken first, then adding the sauce at the end so it thickens and clings without burning, giving you that perfect sticky finish every time. If you enjoy bold chicken recipes, you might also like these baked chicken drumsticks.
Ingredients
- Chicken:
- 1 1/2 lb boneless skinless chicken thighs (cut into bite-sized pieces)
- 1 tbsp cornstarch (for light coating)
- 1 tbsp neutral oil (such as avocado or vegetable oil)
- 1/2 tsp salt
- 1/4 tsp black pepper (freshly ground)
- Sauce:
- 2 tbsp gochujang (Korean chili paste)
- 1 1/2 tbsp honey (or brown sugar, packed)
- 1 tbsp soy sauce (low sodium preferred)
- 2 cloves garlic (minced)
- 1 tsp sesame oil (toasted)
- 1 tsp rice vinegar
- Optional garnish:
- 1 tsp sesame seeds (toasted)
- 2 tbsp green onions (sliced)
Instructions
- Prep the chicken: Cut chicken into even bite-sized pieces, then pat dry with paper towels so the coating sticks and edges crisp properly.
- Season and coat: Toss chicken with cornstarch, oil, salt, and pepper until evenly coated; it should look lightly dusted, not clumpy.
- Preheat the air fryer: Set to 380°F (193°C) for 3–5 minutes so the chicken starts cooking immediately and develops golden edges.
- Air fry the chicken: Arrange pieces in a single layer and cook for 12–15 minutes, shaking halfway, until lightly golden and internal temperature reaches 165°F (74°C).
- Mix the sauce: In a bowl, whisk gochujang, honey, soy sauce, garlic, sesame oil, and rice vinegar until smooth and glossy.
- Coat with sauce: Transfer cooked chicken to a bowl and toss with the sauce until fully coated; it should look evenly red and shiny.
- Finish in air fryer: Return coated chicken to the basket and cook for 3–5 more minutes, shaking once, until the sauce thickens and turns sticky with slightly caramelized edges.
- Garnish and serve: Sprinkle sesame seeds and green onions on top, then serve immediately while the glaze is glossy and the edges are lightly crisp.
Notes
- Make-ahead: Cut and season the chicken up to 24 hours in advance; store covered in the refrigerator until ready to cook.
- Storage: Keep leftovers in an airtight container in the fridge for up to 3 days.
- Freezer: Freeze cooked, unsauced chicken for up to 2 months; thaw and reheat, then toss with fresh sauce for best texture.
- Reheating: Reheat in the air fryer at 350°F for 4–6 minutes until warmed through and slightly crisp again.
- Substitution: Swap chicken thighs for chicken breast, but reduce cook time slightly to prevent drying out.
- Serving suggestion: Serve over steamed rice, in lettuce wraps, or with roasted vegetables for a complete meal.
Nutrition
- Array